Translate

Showing posts with label LCS. Show all posts

Friday, November 15, 2024

CHE update failed on 10.0.41 for step 66 DVT script for service model: MROneBox on the machine

Problem

When trying to apply Version Update /Quality update PU65 (10.0.41) to build/Development Environment  it fails at MROneBox step 66.


To resolve the MR Problem, you can use the following workaround:

  1. Navigate to the deployable package directory: K:\DeployablePackages\<PackageGUID>\MROneBox\scripts\update
  2. Locate the AutoRunDVT.ps1 script:phpCopy code<ServiceVolume>:\DeployablePackages\<PackageGUID>\MROneBox\scripts\Update\AutoRunDVT.ps1
  3. Create a backup of the AutoRunDVT.ps1 file.
  4. Open AutoRunDVT.ps1, clear all its contents, and save the file.
  5. Resume the deployment process in Lifecycle Services (LCS).

This solution bypasses the DVT (Developer Validation Test) execution during deployment, allowing the process to complete successfully.

Wednesday, June 12, 2024

How to use free Microsoft Virtual Machine for Dynamics 365 Finance & Operations

We all understand what Dynamics 365 is and its usage. To understand it deeper and more practically, there needs to be a lab to practice it.

Microsoft provides this lab experience and related content for educational purposes and is intended solely for learning about the covered products and services.

VM Mode provides a free, web-based virtual machine environment to complete the steps in this unit. The link for accessing the lab


Login to VM
Click on 'Launch VM mode or Sign in to launch VM mode' in this unit.
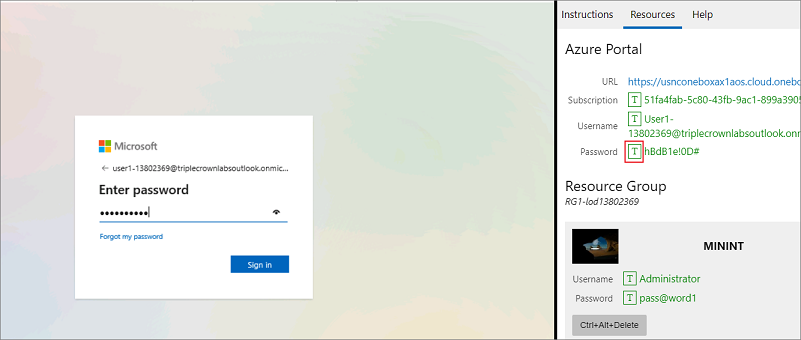
In the Resources tab on the lab sidebar, select the T icon next to Password in the MININT box, to have the administrator password for the Virtual Machine entered for you.
Your mouse cursor will now be on the Password page.
On the Resources tab of the lab sidebar, below the Azure portal heading, select the T icon next to select Password, then press Enter.
Screenshot of the Password field the Enter password dialog box that appears. 
Don't stay signed in or store the password on the virtual machine.
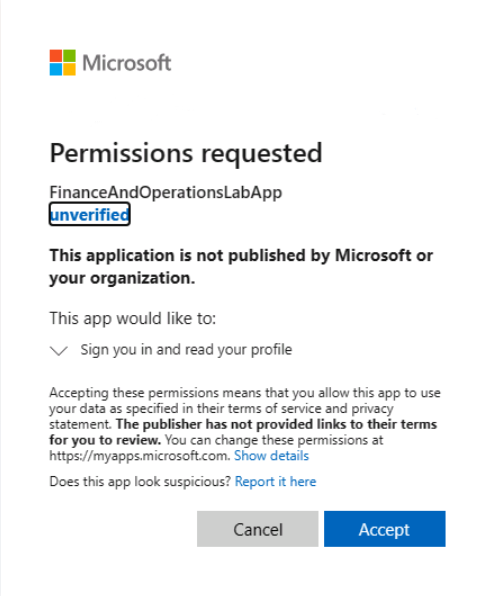
Select Accept on the Permissions requested page.Screenshot of the Permissions requested page.
To see the lab instructions, select the Instructions tab on the lab sidebar.
You can now begin your work on this lab
.
Select Enter.
Microsoft Edge will open. Wait for it to navigate to the Sign-in page for finance and operations.
On the Microsoft Sign-in page in finance and operations, place your mouse cursor into the Username field.
On the Resources tab of the lab sidebar, below the Azure portal heading, select the T icon next to the Username, then press Enter.


For a basic login, use your credentials. Inside the VM, the specific credentials have been given in order with respect to the virtual machine.

Each and every step that needs to be followed is given in the link provided above.

This article is to understand that there are immense resources that are available for free for learning purposes, like this VM. I hope you will like it,

Tuesday, September 12, 2023

Create and Importing Deployable Package to UAT/Production Using Lifecycle Services in Dynamics 365 Finance And Operations

Overview

In Microsoft Dynamics 365 Finance and Operations, development and customization can be done within development environment and deployed to UAT / Production environment. In this blog we are going to discuss how these changes can be deployed to UAT / Production environment

What is a deployable package?

Let’s first define what a development environment package or a deployable package is, before we dive into the deployment process. A deployable package is a collection of customizations and extensions that have been developed in a development environment. This package contains the code, metadata, and configurations that can then deploy to the UAT or Production environment.

Steps for deploying changes using Lifecycle Services

Step 1: Create Deployable package and save it in a folder.

Before creating a deployment package, it is recommended to perform a full build of the required models. 
This ensures that all changes and customizations are included in the deployment package. 
In Microsoft Visual Studio, select Extensions >Dynamics 365 > Build Models > Full Build and select all models. Alternatively, select only the models that have been modified or customized.


After you have completed the development stage, follow these steps to create a deployable package from Visual Studio.
In Microsoft Visual Studio, select Extensions >Dynamics 365  Deploy > Create Deployment Package.


Select the packages that contain your models, and then select a location in which to create the deployable package. 


For more information about the deployable package creation, please refer here

Step 2: Go to https://lcs.dynamics.com and enter your credentials

Step 3: Click on your implementation project. Then go to Asset Library using 3 bars icon as shown in the below screenshot.


Step 4: Go to Software deployable package Tab in Asset Library. Then add the new package here which we have created from dev environment.

Step 5: As we can see in below screenshot, we need to give name for uploading our package into Asset Library first. Then the package will be eligible to deploy to UAT or Production.


Step 6: Once package is added into asset library and if you want to publish it in the UAT environment, click on the highlighted option in the screenshot below.


Step 7: Now go to navbar Maintain and click on Apply updates


Step 8: Provide unique name for you Package. Such as write package name with date and then select the package uploaded in asset library and click on Apply 


Step 9: It can take about 1 to 3 or more hours depending on the size of the package.


Step 10: After successful deployment we can check the Activity status completed or Rollback. If we get any errors during the deployment, it will be rollback and we need to fix it in development environment. Afterwards the whole process of deployment will repeat.


Step 11: Once the deployment is done on the sandbox, make the deployed package as release candidate for moving to production.


Step 12: 
To initiate package deployment on production, navigate to production environment details page and select Maintain>Update Environment, and then select our package and mention the production downtime. 


Best Practices for Deploying a Development Environment Package to UAT/Production

To ensure a successful deployment, it’s important to follow these best practices:

  1. Always test the deployment in a non-production environment first.
  2. Include all the required models and packages in the deployable package.
  3. Properly configure the target environment so that it can meet the requirements of the customizations and extensions.
  4. Take a backup of the target environment before deploying the package.
  5. Monitor the deployment progress and resolve any issues that arise during the deployment process.

Note: 
These all are manual steps, but till sandbox package deployment can be achieved through DevOps continuous deployment (Automated deployment) using Azure DevOps release pipeline.

Rollback:
We have the option to rollback our changes, also we have the option to create support ticket with Microsoft (LCS project>Work items>Support issues>Submitted to Microsoft) for deployment related issue, make sure you enabled the notifications on LCS user settings to get the deployment related email updates.

Install Quality update in a Sandbox or Production environment in LCS Dynamics 365 F&O

Install Quality update in a Sandbox or Production environment in LCS #d365fo

A quality update is a cumulative, roll-up build that contains fixes for known issues that are specific to the service update.

A quality update is available when your environment is running the same version of the current service update (n), or when your environment is running on one version older than the current service update (n-1). For example, if the current service update is version 10.0.2, you will have the option to choose a quality update if you’re running version 10.0.2, or if you’re running one version older, which is 10.0.1.

There will be no quality update available for any version that’s older than 2 versions of the current service update. You will have to apply the latest service update to stay current.

Access your LCS Project


Access the environment you want to check (choose Sandbox or Production environment)


To create a package for a Quality Update of an Environment you need to go in the “Available updates” section in the Environment details page and click on the “View update”


After which we need to click on “Save package” to create our package


Click on “Select all” and after that on “Save package” again


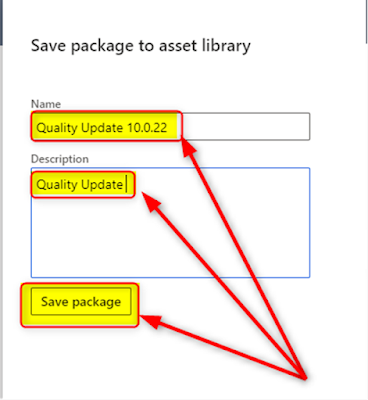
Give it a reasonable Name and Description for you

Save the package (it may take several minutes) and click done.


After that the package should appear in the Asset library give it some time to get validated and you can go and apply it.


Access again into your environment

Click on “Maintain” –> “Apply updates”


Select Quality update from your asset library list, give it a unique name then click “Apply” to install

Tuesday, September 5, 2023

Running Custom X++ Scripts in Tier 2 or Higher Version Production environment without downtime in Dynamics 365 F&O

Example:

Let say example, you want to update the inventory Transactions of the particular items in Tier -2 or higher version.


Steps to follow:

1. Go back to Dev box, create a Model and add required references package

2. Create a runnable class to update for the particular transaction

3. Then create an deployable package.

4. Once package is created, Go back to Tier 2 or higher version.

5. Go to System Administration Module 

path: System Administration --> Periodic Task --> Database --> custom Scripts


6. Click upload 

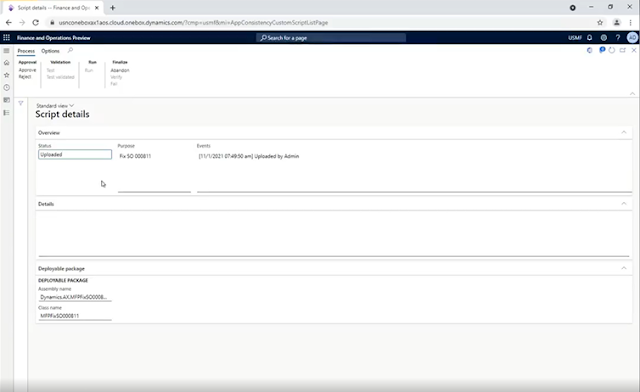
Upload the Deployable package in Custom scripts 

7. Once package is upload.
8. Someone has to approve the upload Deployable package


9. Once package is approved, then test the process.

10. if result as expected then click RUN, script updated the Inventory Transactions for the particular items without downtime.

Monday, September 4, 2023

How to Handle Batch Jobs When Disabling or Deleting a User in Dynamics 365 Finance and Operations

I had someone reach out to me about the ‘right’ way to handle batch jobs when disabling or deleting a user from D365FO. Let’s look at the options you have to avoid any issues.

Why This is an Issue

Batch jobs within D365FO allow for a way to execute a set of instructions that can be scheduled to run on a periodic basis. These are used extensively to perform business calculations and because they can be set to execute at a certain time, can be performed outside of normal business hours to minimize impact to the system.

Each batch job runs under the context of a user within the system. If that user is disabled, the batch jobs tied to that user will not be able to execute and will fail. What’s more, if a user is deleted any batch job tied to that user is also deleted!

These issues are well known as there have been multiple posts about this topic:

Does batch job stop working if you disable the user account which set it up?

Life’s a batch… (from fellow Microsoft MVP Andre Arnaud de Calavon)

The two scenarios above can obviously lead to unintended consequences within the system. So how do we address this?

Possible Solutions

I have two separate ways that I have used with customers to address this issue:

– Use table events to capture when a change occurs to the UserInfo table (either disabling a user or deleting a user) and assign all batch jobs for that user to an ‘admin’ type user

– Build a custom form to allow you to reassign batch jobs to any user you would like, using this you can be proactive about reassigning batch jobs before you actually disable or delete a user

The first scenario is more static as you are always assigning the batch jobs to a single user but it is easier to build. The second solution is more flexible but adds a lot of complexity for the solution.

The custom form option will probably be dependent on the customer, so let’s look at how we could use the first option to come up with a solution.

Table Event Solution

Using table events we can listen for events that update or delete from the UserInfo table, which is the table that stores master data information about users. Specifically we need to handle two different scenarios where the user impacted has batch jobs tied to them:

· An update to a user that changes the user from ‘enabled’ to ‘disabled’

· A delete to a user

To determine if a user change would impact a batch job we first have to look to see where batch jobs are tied to a user, on the BatchJob table we can see there is an ExecutingBy field. This is the user the batch job will execute as and the field we need to change based on events above.


So the idea would be to listen for changes to a user that meet one of the criteria above and if there is such a change check to see if that user is set to ‘run’ any batch jobs and if so to change the ‘run by’ to another user.

To do this, I added the following code to our test environment:

[DataEventHandler(tableStr(UserInfo), DataEventType::Updating)]

    public static void UserInfo_onUpdating(Common sender, DataEventArgs e)

    {

        BatchJob batch;

        UserInfo ui;

        str adminUserId = "Admin";

        Common newRecord = sender;

        Common oldRecord = sender.orig();

        ui = newRecord;

        int tableId = tableName2Id("UserInfo");

        int enableFieldId = fieldName2Id(tableId, "enable");

        if(newRecord.(enableFieldId) != oldRecord.(enableFieldId))

        {

            if(ui.enable != true)

            {

                while select forupdate batch where batch.ExecutingBy == ui.id

                {

                    ttsbegin;

                    batch.ExecutingBy = adminUserId;

                    batch.update();

                    ttscommit;

                }

             }

        }

     }

    [DataEventHandler(tableStr(UserInfo), DataEventType::Deleting)]

    public static void UserInfo_onDeleting(Common sender, DataEventArgs e)

    {

        BatchJob batch;

        UserInfo ui = sender;

        str adminUserId = "Admin";

       while select forupdate batch where batch.ExecutingBy == ui.id

        {

            ttsbegin;

            batch.ExecutingBy = adminUserId;

            batch.update(); 

            ttscommit;

        }

    }


To break down the code a bit:

– The first section is listening for update events happening to the UserInfo table and it is explicitly looking for changes to the ‘enable’ field. If the old and new values for the ‘enable’ field are different and if the new value is set to false then look for batch jobs where the ‘ExecutingBy’ user is this user and update to an admin user.

– The second section is listening for delete events happening to the UserInfo table and performing the same check for batch jobs where the ‘ExecutingBy’ user is set to the user being deleted and updating the record to an Admin user. One thing to note here is that both events are listening to the Updating/Deleting event, this is to hook into the event before it is completed which in the case of a deletion allows us to modify the batch job record before it would be deleted because the user is deleted.

Testing Solution

Let’s first go in and test disabling a user with batch jobs tied to them. We are going to use this CHARLIE user as our test, he has a couple batch jobs where he is the ‘Run by’ user:

When we go to disable the user we get this warning:


Looking at the code, this is because within a validateWrite() method of the user UserInfo table that any batch job created by or executing by the user will generate this warning:

In our case though, the ‘Run by’ user is already updated to our Admin user:

So now that we have tested updating a user, we can now switch to testing deleting a user, to test this we will use the CHRIS user which has the following batch job associated to his user:


So now if we go ahead and delete this user:


We can see this batch job still exists (!) and has been moved to ‘run by’ our Admin user:


Conclusion

If you wanted to take this a step further you could take the code above and utilize it when creating a custom form if you wanted. One thing I will say is that to the point Andre made in his blog post from above all of this can be avoided if the batch job is set up to use a service account, which also would be my recommendation but in case that is not possible the above solution will help to ensure your batch jobs continue to run smoothly.

Apply Environment Update via Command Line in Dynamics 365 Finance and Operations

Following up on my previous post about deploying a local VHD of D365FO, I wanted to show how you can then update your environment when Microsoft releases newer versions.

The first step is to download the update deployable package from LCS by navigating to the Shared Asset Library:


Then navigating to the ‘Software Deployable Package’:


Now download the deployable package update that you would like, in our case we are going to use this preview version of 10.0.35:

The file downloaded will be a zip file, you will not have to extract the contents. Note that you will need to ensure the the folder name that you extract the data to does not have any spaces in it as the installation process does not support that.


Now you can open a Command Prompt (with administrator privileges) and navigate to the folder where the update package resides.

With normal deployable packages you would be able to perform the command ‘AXUpdateInstaller.exe devinstall’ after navigating to the unzipped folder. But you can see if you execute this on the update deployable package from Microsoft you will get the error ‘The devInstall option is not applicable to the current deployable package’.

Once these commands are executed we can see the installation process will begin:


The installation process can take quite a bit of time (sometimes several hours depending on the resources your development environment has). You will know it has completed when the command prompt returns to a new line and the previous command shows ‘the step completed’.


Once the installation has completed, I always recommend restarting the development environment. Once completed we can check the version information to confirm that the environment has indeed successfully updated.

Resources

How to Install a Package in D365FO – great blog post from another Microsoft MVP Peter Ramer showing the different options for installing a deployable package update to a D365FO environment.