Translate

Showing posts with label D365FO. Show all posts

Friday, June 27, 2025

📊 How to Split Financial Dimensions into Columns Using SQL in D365 F&O

In Microsoft Dynamics 365 Finance and Operations, financial dimensions are stored in a compressed form using fields like LedgerDimension and DefaultDimension. While this is great for system efficiency, it’s not very human-readable—especially when you're running queries or building reports directly from the database.

In this article, I'll show you how to split LedgerDimension and DefaultDimension into individual columns using SQL, so that each dimension (like CostCenter, ItemGroup, etc.) appears in its own field. This is very useful when building reports, integrating with Power BI, or analyzing data directly from SQL Server.

🧩 1. Split Ledger Dimension into Individual Columns

Use this query when you want to extract Main Account + Dimensions (i.e., full ledger dimension combination used in transactions):

SELECT
    Dimension,
    MainAccount,
    Claims,
    Functions,
    ItemGroup,
    CostCenter,
    Market_IC,
    MTO,
    Projects,
    Vendor,
    Agreement
FROM
(
    SELECT
        DAVC.RecId AS Dimension,
        DA.Name,
        DALVAV.DisplayValue
    FROM
        DimensionAttributeValueCombination AS DAVC
        JOIN DimensionAttributeLevelValueAllView AS DALVAV
            ON DALVAV.VALUECOMBINATIONRECID = DAVC.RecId
        JOIN DimensionAttribute AS DA
            ON DA.RecId = DALVAV.DIMENSIONATTRIBUTE
    WHERE
        DAVC.MainAccount != 0
) AS SourceData
PIVOT
(
    MAX(DisplayValue)
    FOR Name IN (
        MainAccount, Claims, Functions, ItemGroup, CostCenter,
        Market_IC, MTO, Projects, Vendor, Agreement
    )
) AS PivotTable;

 🔍 Note: Replace the dimension names in the IN (...) clause with the actual dimension names configured in your environment.


📁 2. Split Default Dimension into Individual Columns

Use this query when you're dealing with DefaultDimension (used in master records like customers, vendors, items, etc.).

SELECT
    DefaultDimension,
    Claims,
    Functions,
    ItemGroup,
    CostCenter,
    Market_IC,
    MTO,
    Projects,
    Vendor,
    Agreement
FROM
(
    SELECT
        DAVC.RecId AS DefaultDimension,
        DA.Name,
        DAVSI.DisplayValue
    FROM
        DimensionAttributeValueCombination AS DAVC
        JOIN DimensionAttributeValueSet AS DAVS
            ON DAVS.RecId = DAVC.RecId
        JOIN DimensionAttributeValueSetItem AS DAVSI
            ON DAVSI.DIMENSIONATTRIBUTEVALUESET = DAVS.RecID
        JOIN DimensionAttributeValue AS DAV
            ON DAV.RecId = DAVSI.DIMENSIONATTRIBUTEVALUE
        JOIN DimensionAttribute AS DA
            ON DA.RecId = DAV.DIMENSIONATTRIBUTE
    WHERE
        DAVC.MainAccount = 0
) AS SourceData
PIVOT
(
    MAX(DisplayValue)
    FOR Name IN (
        Claims, Functions, ItemGroup, CostCenter,
        Market_IC, MTO, Projects, Vendor, Agreement
    )
) AS PivotTable;
 

💡 Use Cases

  • Exporting transaction data for reporting

  • Creating simplified views for Power BI

  • Debugging the ledger and default dimensions

  • Building a staging table for the data warehouse

✅ Tips

  • These queries are meant for read-only reporting purposes.

  • Use them in your Data Lake, BYOD, or on-prem reporting environments.

  • Ensure dimension names match your environment’s configuration.

🔗 Conclusion

Splitting LedgerDimension and DefaultDimension into readable columns using SQL is a powerful technique to simplify financial data analysis. This is especially helpful for technical consultants, BI developers, and finance teams working on reporting, integrations, or validations.

Let me know in the comments if you'd like a downloadable view or Power BI model version of this!

Happy coding! 💻


🔍 Stay tuned for more D365FO technical posts

📌 Bookmark: https://d365fohunt.blogspot.com

☁️ Execute D365 F&O SSRS Report with Parameters and Upload Report Output to Azure Blob Storage Using X++

In many real-world scenarios, businesses need to automatically generate SSRS reports from Dynamics 365 Finance & Operations (D365FO) and store them externally for auditing, sharing, or integration purposes. This blog walks you through how to execute an SSRS report with parameters, convert it into a PDF byte stream, and upload the output to Azure Blob Storage using X++ and the latest Azure SDK.

In this article, we'll walk through how to:

  • Execute a parameterised SSRS report using X++

  • Render the report as a PDF byte stream

  • Upload the output to Azure Blob Storage using the latest Azure SDK (Azure.Storage.Blobs)

✅ Why Use This?

Uploading reports to Azure Blob Storage allows you to:

  • Automate report delivery

  • Store large reports securely

  • Integrate with Power BI, Logic Apps, or third-party APIs

  • Replace manual downloads or email-based report distribution

✅ Steps to Achieve This

  1. Create a controller class to run the SSRS report with parameters.

  2. Create an Azure Storage Account in your Azure subscription.

  3. Create Blob containers and optional folders to organise your report files.

  4. Get the connection string from Azure to authenticate from X++.

  5. Render the SSRS report to a byte stream in PDF format.

  6. Upload the stream to Azure Blob Storage using Azure.Storage.Blobs.

🛠 Prerequisites

  1. Add references to these .NET assemblies:
    • Azure.Storage.Blobs
    • System.IO
  2. Ensure your storage account connection string and container are correctly configured.

🌐 How to Set Up Azure Storage for Report Uploads

Follow these steps in the Azure Portal to create the required storage setup:

🔹 Step 1: Log in

Visit https://portal.azure.com and sign in with your Azure credentials.

🔹 Step 2: Create Storage Account

  • Navigate to Storage accounts

  • Click + Create

  • Fill in details: Subscription, Resource Group, Name, Region

  • Choose Standard performance and Hot access tier (default)

🔹 Step 3: Create Blob Container

  • Once the storage account is created, go to it

  • Select Storage browser from the left menu

  • Click on Blob containers

  • Create a new container (e.g., reportupload)

    • Set access level to Private (recommended for security)

🔹 Step 4: (Optional) Create Folders

  • Open your container

  • Click + Add directory to create folders like ReportUpload

🔹 Step 5: Get the Connection String

  • Go to the Access keys section under Security + networking

  • Copy the Connection string of key1

    • Example format:

(DefaultEndpointsProtocol=https;AccountName=youraccount;AccountKey=yourkey;EndpointSuffix=core.windows.net)

🔄 What's Changed?

The legacy WindowsAzure.Storage package is deprecated. The new library:

  • Uses Azure.Storage.Blobs.

  • Has updated method names and authentication mechanisms.

  • It is available via NuGet: Azure.Storage.Blobs

💻 X++ Code with Latest SDK

using Azure.Storage.Blobs;
using Azure.Storage.Blobs.Specialized;
using System.IO;
 
public class ExampleUploadReportToBlobStorage
{
    public static void main(Args _args)
    {
        ExampleUploadReportToBlobStorage uploadObj = new ExampleUploadReportToBlobStorage();
        BlobContainerClient containerClient = uploadObj.connectToAzureBlob();
        uploadObj.uploadFileToBlob(containerClient);
    }
 
    public BlobContainerClient connectToAzureBlob()
    {
        str connectionString =
            "DefaultEndpointsProtocol=https;AccountName=youraccountname;AccountKey=yourkey;EndpointSuffix=core.windows.net";
 
        BlobServiceClient blobServiceClient = new BlobServiceClient(connectionString);
        BlobContainerClient containerClient = blobServiceClient.GetBlobContainerClient("reportupload");
 
        info(strFmt("Connected to Azure Blob Container: %1", containerClient.getName()));
        return containerClient;
    }
 
    public void uploadFileToBlob(BlobContainerClient containerClient)
    {
        System.Byte[] reportBytes = ExampleUploadReportToBlobStorage::getSSRSBytes("ReportOutput");
 
        if (reportBytes)
        {
            str blobPath = "ReportUpload/UploadFile.pdf"; // folder + filename
            BlobClient blobClient = containerClient.GetBlobClient(blobPath);
 
            System.IO.MemoryStream stream = new System.IO.MemoryStream(reportBytes);
            blobClient.Upload(stream, true); // Overwrite if file exists
 
            info("File uploaded successfully to Azure Blob Storage.");
        }
    }
 
    public static System.Byte[] getSSRSBytes(str _fileName)
    {
        SrsReportRunController controller = new SrsReportRunController();
        SRSPrintDestinationSettings settings;
        System.Byte[] reportBytes;
        SRSProxy srsProxy;
        SRSReportRunService srsService = new SRSReportRunService();
        Map paramMap;
        SRSReportExecutionInfo execInfo = new SRSReportExecutionInfo();
 
        controller.parmReportName(ssrsReportStr(TransactionsReport, Report));
        controller.parmShowDialog(false);
        controller.parmLoadFromSysLastValue(false);
 
        // Set report parameters
        ReportParametersDataContract contract = controller.parmReportContract().parmRdpContract() as ReportParametersDataContract;
        contract.parmFromDate(today() - 5);
        contract.parmToDate(today());
 
        // Configure output
        settings = controller.parmReportContract().parmPrintSettings();
        settings.printMediumType(SRSPrintMediumType::File);
        settings.fileName(_fileName + ".pdf");
        settings.fileFormat(SRSReportFileFormat::PDF);
 
        controller.parmReportContract().parmReportServerConfig(SRSConfiguration::getDefaultServerConfiguration());
        controller.parmReportContract().parmReportExecutionInfo(execInfo);
 
        srsService.getReportDataContract(controller.parmReportContract().parmReportName());
        srsService.preRunReport(controller.parmReportContract());
 
        paramMap = srsService.createParamMapFromContract(controller.parmReportContract());
        Microsoft.Dynamics.AX.Framework.Reporting.Shared.ReportingService.ParameterValue[] paramArray =
            SrsReportRunUtil::getParameterValueArray(paramMap);
 
        srsProxy = SRSProxy::constructWithConfiguration(controller.parmReportContract().parmReportServerConfig());
 
        reportBytes = srsProxy.renderReportToByteArray(
            controller.parmReportContract().parmReportPath(),
            paramArray,
            settings.fileFormat(),
            settings.deviceinfo());
 
        return reportBytes;
    }
}

🔐 Security Tips

  • Avoid hardcoding the connection string in production. Use Key Vault or Azure App Configuration.

  • Always restrict access to the container using RBAC or SAS tokens instead of full account keys.

  • Set your Blob container access level to Private unless you explicitly need public access.

  • Use Shared Access Signatures (SAS) or Managed Identities in production scenarios.

📌 Business Use Cases

This solution is ideal for:

  • Automatically exporting and archiving daily/weekly/monthly reports

  • Sharing output with external systems or teams via Azure Storage

  • Generating custom reports on demand and storing them securely in the cloud

✅ Summary

In this post, we’ve seen how to:

✔️ Execute an SSRS report with parameters using X++
✔️ Render it as a PDF and convert it into a byte stream
✔️ Upload the output to Azure Blob Storage securely using the latest Azure SDK

    This approach enables automated, scalable, and secure report storage in the cloud, perfect for compliance, integrations, and downstream analytics.

Tuesday, September 5, 2023

How To Enable/disable maintenance mode Tier 1 Microsoft Dynamics 365 Finance and operations

Tier 1 : 

There are the following ways to enable/disable maintenance mode on DEV/could hosted boxes:

SQL

In finance and operations for making any changes in License configuration form, you need to enable maintenance mode and after making desirable changes you need to disable to this mode. You can enable or disable maintenance mode using SQL query as well as command prompt. In this blog, we are performing this operation using the SQL query.

Query status:

You can verify status using following command:-

SELECT * FROM [AxDB].[dbo].[SQLSYSTEMVARIABLES]


Enable maintenance mode:

Click on New Query and enter the following query to enable maintenance mode:-

update dbo.SQLSYSTEMVARIABLESset dbo.SQLSYSTEMVARIABLES.VALUE =1

where dbo.SQLSYSTEMVARIABLES.PARM = ‘CONFIGURATIONMODE’


Restart IIS Express/IIS and do the required steps like enable/disable configuration keys. if required, Execute DB sync

Disable maintenance mode:

after desired changes are made you can disable mode using the following command

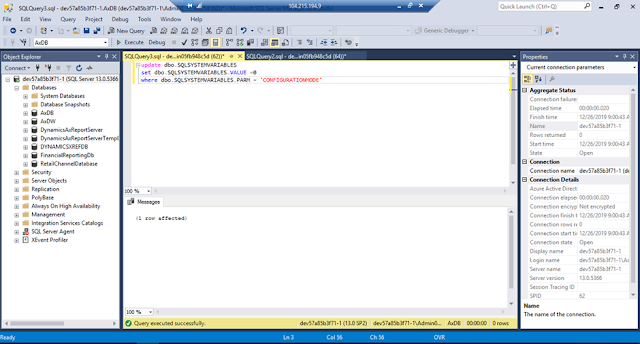
update dbo.SQLSYSTEMVARIABLESset dbo.SQLSYSTEMVARIABLES.VALUE =0

where dbo.SQLSYSTEMVARIABLES.PARM = ‘CONFIGURATIONMODE’


CMD

Open command prompt as administrator.

Enable maintenance mode (replace **axdbadmin_from_lcs** value):

K:\AosService\PackagesLocalDirectory\Bin\Microsoft.Dynamics.AX.Deployment.Setup.exe --metadatadir J:\AosService\PackagesLocalDirectory --bindir J:\AosService\PackagesLocalDirectory\Bin --sqlserver . --sqldatabase axdb --sqluser axdbadmin --sqlpwd **axdbadmin_from_lcs** --setupmode maintenancemode --isinmaintenancemode true

Disable maintenance mode (replace **axdbadmin_from_lcs** value):

K:\AosService\PackagesLocalDirectory\Bin\Microsoft.Dynamics.AX.Deployment.Setup.exe --metadatadir J:\AosService\PackagesLocalDirectory --bindir J:\AosService\PackagesLocalDirectory\Bin --sqlserver . --sqldatabase axdb --sqluser axdbadmin --sqlpwd **axdbadmin_from_lcs** --setupmode maintenancemode --isinmaintenancemode false


D365FO.Tools

Open PowerShell as Administrator

Installation of d365fo tools:

Install-Module -Name d365fo.tools

Query status:

Get-D365MaintenanceMode

Enable maintenance mode:

Enable-D365MaintenanceMode

Disable maintenance mode:

Disable-D365MaintenanceMode


Monday, September 4, 2023

How to get rid of a stuck report design in SSRS

It is difficult to say if your recent changes to an SSRS report design are really deployed. I suggest that any textbox be colored to visualize it (you can revert it in the end).
However, sometimes previous design is stuck on the server, and you still see no changes deployed, nevertheless, you already restarted Reporting services. Fortunately, there is a direct way to delete such a stubborn report from the server.
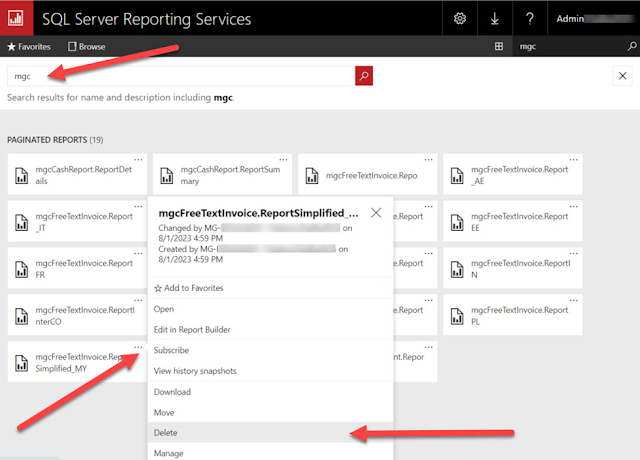
Open Report Server configuration manager as administrator and apply Portal URL setting if it is not done yet.


Then go for your report and delete it.


Next deployment should be OK.