The blog post will showcase the process of creating a cloud-hosted environment using LCS and the Azure Portal, in a step-by-step manner.
Use this guide to create a personalized environment
for learning or presale purposes.
Step 1: log in to the LCS.
Login to LCS using your credentials.
Step 2: Create a new project
Inside the recent project, click on the ‘+’ button
to create a new project.

Step 3: Navigate to the 'Finance and Operation'
section.

Step
4: Select
the project purpose.
For learning or presale purposes, choose the first option when creating a project.

Step
5: Enter
Project Details.
Provide the project name, description, and industry on the following page. Click on the ‘Create’ button.

The project will be created once the create button
is clicked.
Step 6: Login to Azure Portal
Access the Portal.Azure.com using your LCS login
credentials.
Step 7: Click on the subscription.


Step
9: Choose
the IAM and create a new role.

Step
10: Select
the role assignment.

Step 11: Select the contributor for the role.

Step 12: Select the member tab.

Step 13: Click on the select Members.

Step
14: Select
Dynamic Deployment Service.
To proceed, choose the 'Dynamic deployment service' option after clicking the 'Select Members' button.

Step 15: Review and Assign Role
Click on ‘Next’ and review the role. Once done,
click on ‘Assign’. Your role is now created.

Return to
LCS for the next step.


Step
19: Enter
Azure Connector Details
Specify a name for the Azure Connector, provide your Azure subscription ID, and enable the ARM toggle.
Note: Retrieve the Azure subscription ID by copying it from the Azure portal


The Azure role assigned to you can be viewed on the
following page.

Step 20: Certificate from LCS after receiving it.

Step 21: To activate your Azure subscription, upload the certificate to the portal.

Step 22: Continue with the remaining steps of the LCS.
Select the Azure region and connect.

Azure Connector is created now.


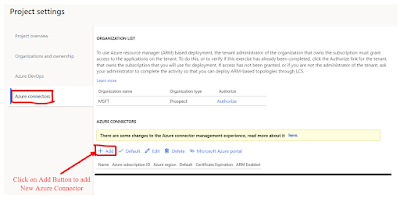
Step 24: Click on Add button.

Select the latest Application version.

Step 25: Select the environment topology.
For development purposes, choose DEVTEST; for demos, choose DEMO.

Select 26: Select Develop for development purposes.
Step 27: Specify the environment name and choose an appropriate VM size according to your needs.

Click on deploy.

Once you click on the ‘Deploy’ button,
Step 28: The deployment shall begin and will now be in queued status

Step 29: Now in Deploying status

The Cloud-hosted environment will go to the deploying state. The deployment of the environment will take place in approximately 8-9 hours.
Important Note: Remember to set auto-shutdown for the VM after deployment and access the dev machine from LCS or Azure portal.
I hope that this manual will assist you in building your own cloud-hosted setup utilizing LCS and Azure Portal.